

Export
Export is done from the Tool Panel in their respective Space. This is either 3D View, Shader Node Editor or Geometry Nodes Editor. The Panel is in the Asset Wizard Pro tab.
Object, Object Batch Export and Collections can be exported from 3D View, Materials and Shader Node Groups from Shader Node Editor and finally Geometry Node Groups from Geometry Node Editor. All Export Panels share an identical Part.
Just the lower section is tailored to the respective Space.
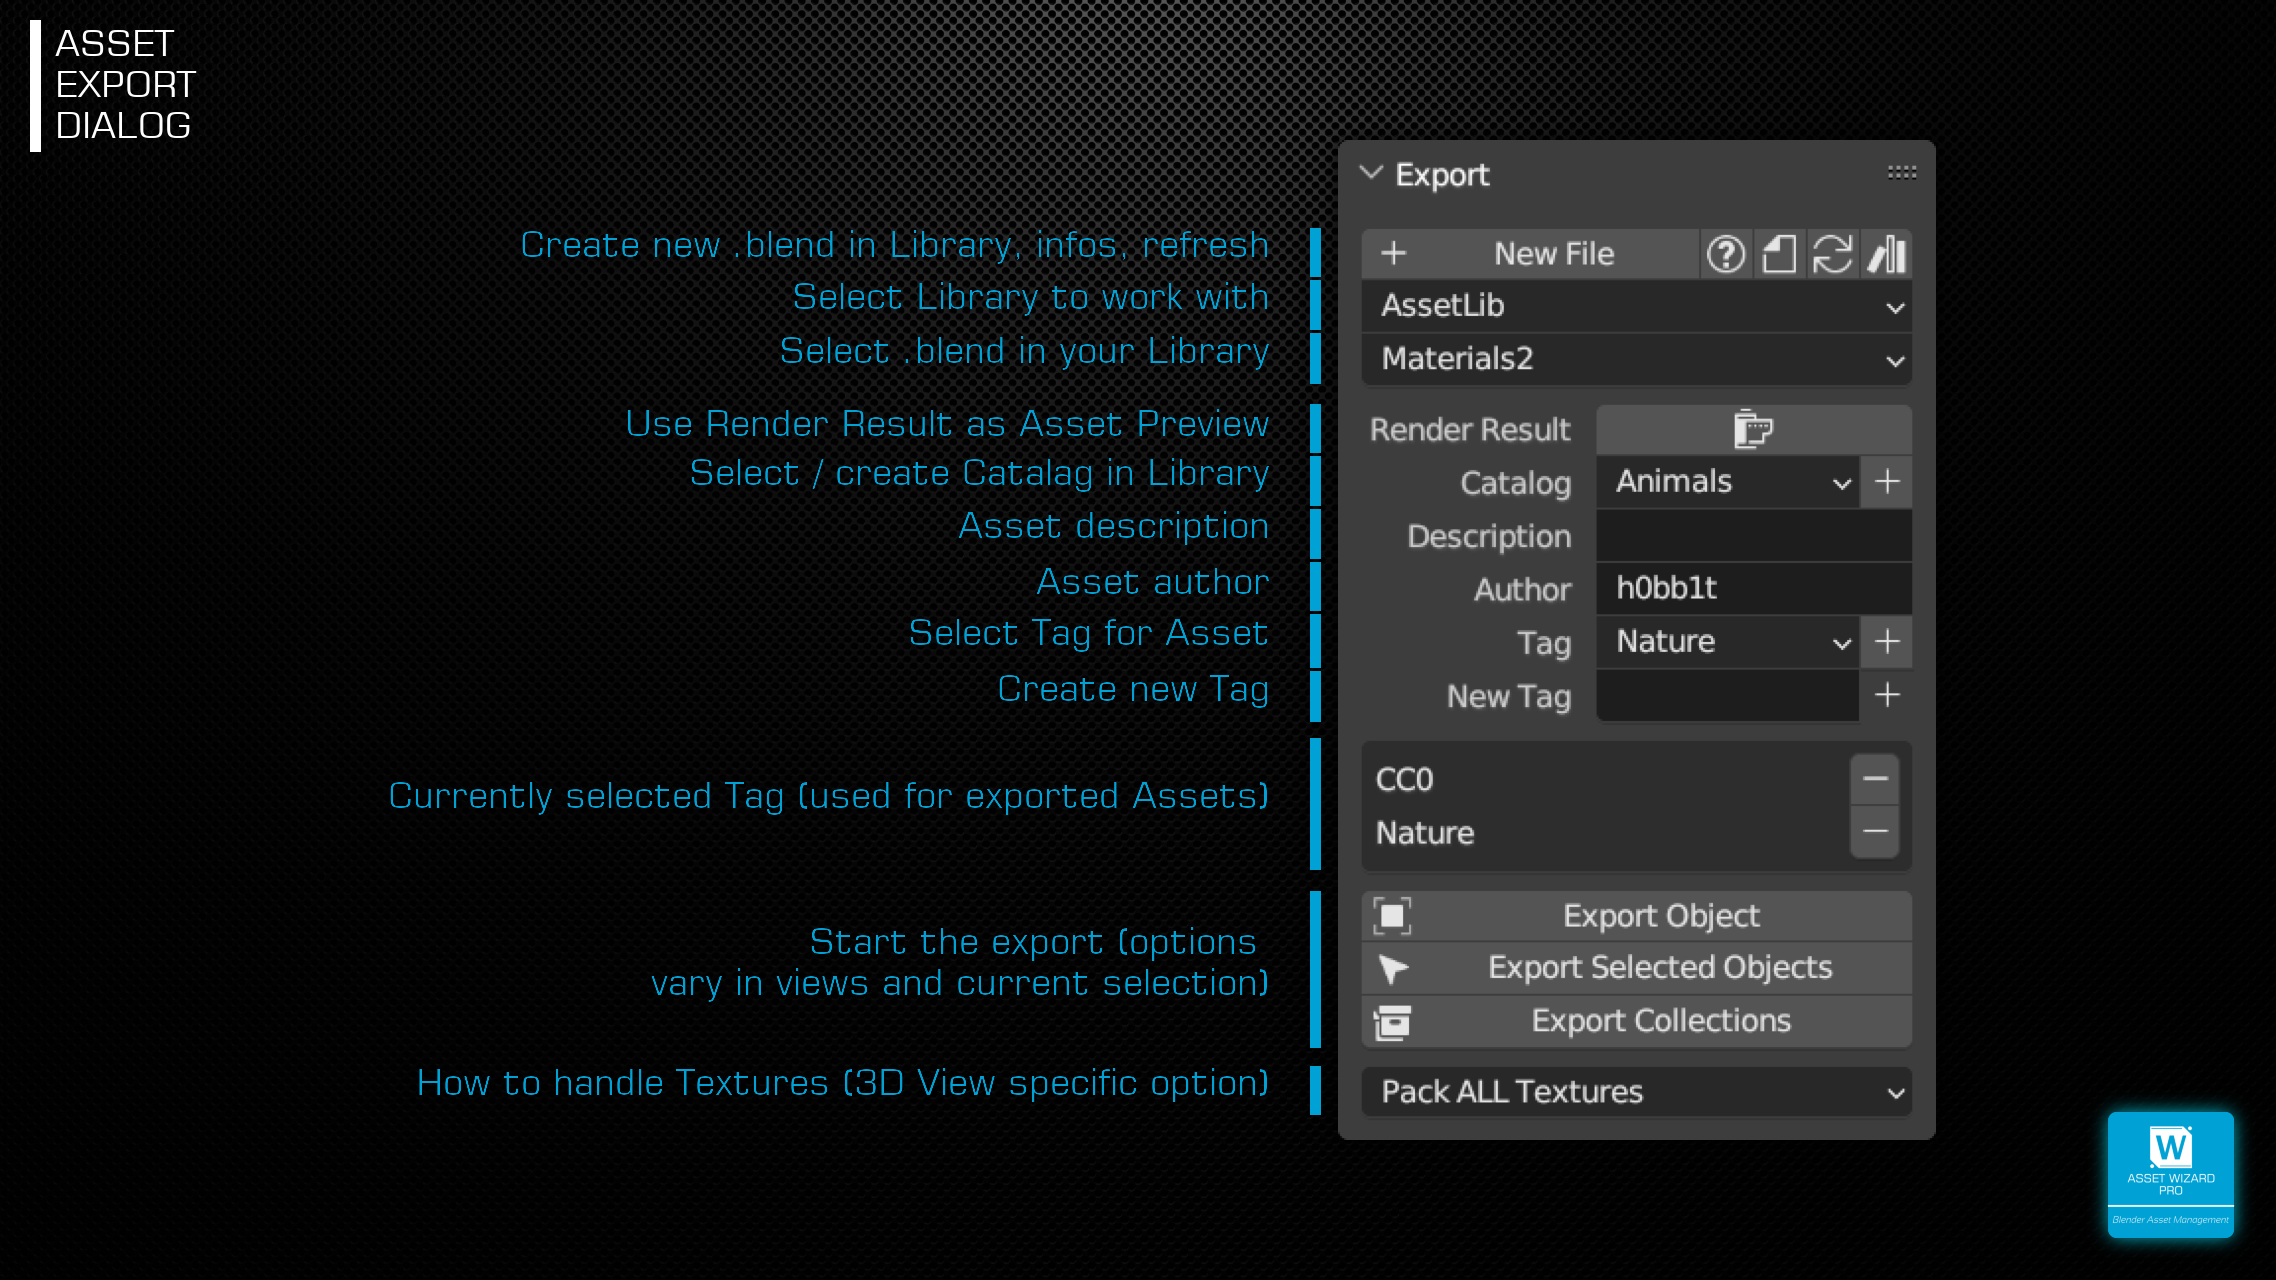
- Library Group: The most upper Region controls to Output File for your Asset.
- New File: Create a new empty Blend Library File. Upon clicking, a new Dialog opens, where you can enter the File Name. Clicking OK creates the File.
- Show Library Blend Info
 : This opens a View just below this top Section, showing File Size, Number of Objects, Collections, Materials and Node Groups from the current selected Output File.
 - Open Library Blend
 : Starts a new Instance of Blender and open the current selected Output File.
 - Refresh AWP
 : Rescans your Library for Files, Catalog Info and Shader/Geometry Nodes. Useful when you externally modify your Library. AWP stays up to date when exporting, but does not track external changes (for performance reasons).
 - Refresh Blenders Asset Browser
 : I’ve tried to update the Asset Browser automatically on Export, but it seems Blender doesn’t like this all the time. So please use this Button (or the Refresh Button in Asset Browser) to update.
 - Asset Library: You can manage multiple Asset Libraries, managing them in Blender’s Preferences (File Paths/Asset Libraries). If you have more than one, select the active one in this Box (if you change the Settings in Blenders Preferences, please hit the Reresh AWP Button once).
- Active Library Blend File: This is the currently active File were Assets are exported.
- Asset Data:
- Render Result: If this is ticked, AWP will not render a Preview Image for your Asset, but use your current Render Result Image (you must have one), crop the center Part and resize it to the configured Preview Image Size (Preferences).
- Catalog: Select the Catalog, that the Asset should be mapped to. The + Button opens a dialog, where you can create new Catalogs/Subcatalogs.
- Description and Author: This should be straightforward.
- Tags: Select a Tag from the stored Tags (see Configuration as well) and hit the + Button to add it for the next Export Operation(s).
- New Tag: No need to enter the Preferences to add new Tags. Enter a Tag here and hit the + Button next to it, it will be stored to your internal Tag list, as well as to the active List.
- Selected Tags: Tags in this List where used in the next Export and stay there for more Exports. Hitting the – Button next to them, will remove them from the active List (but not your stored List).
- Object / Collection Export – 3D View specific:
- Export Object: This exports the active selected Object into the current Library. During Export, either a Preview Image is rendered or your Render Result is used (see section above).
- Export Selected Objects: Exports all selected Objects one by one. This may take a long time, depending on amount and complexity of your Objects.
- Export Collection + Drop Down Selection: This exports the Collection selected in the List below as one Asset.
- Texture Handling: Option to define how Textures are handled on export. See here.
- Material Export – Shader Node Editor specific:
- Export Material: Exports the active Material and renders a Preview on a Shader Ball. In the Scene in your Library, a Plane is created with this Material applied to it, so looking in your Library, you can see all exported Materials.
- Export Node Group: If a Node Group is selected in your Node Tree, this Button is shown and does what the Label says. It exports this Node Group, using the Type in the Box below as first Tag. AWP will use this information to group Node Groups on the Import Panel and in Pie Menus. You can modify this list in Preferences.
- Geometry Nodes Export:
- Export whole Tree: The Tree that is currently used in the GNE is a Node Group itself, so this Button will export the whole Tree as one Node Group. All other info is identical to the next point:
- Export Node Group: Only visible is the selected Node is a Node Group. Exports this Node Group and use the Type selected below this Button as first Asset Tag. This is later used on the Import Panel and in Pie Menus to Group Node Groups. You can modify this list in Preferences.
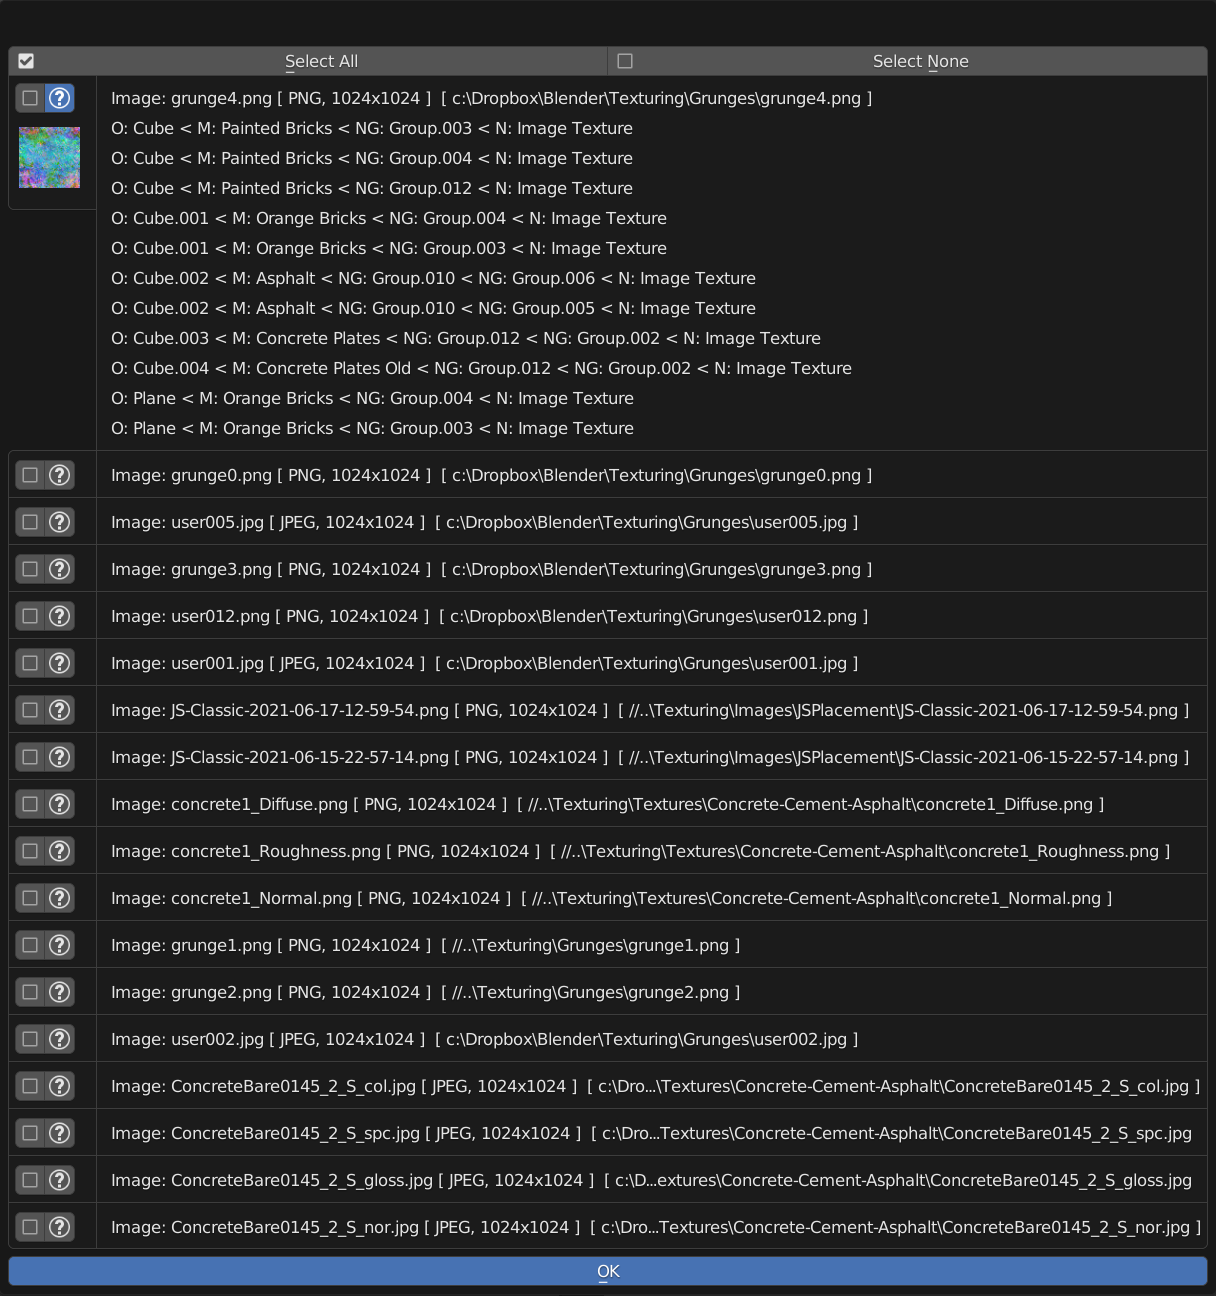
Pack Images
On export, Asset Wizard Pro checks which image files are used by your assets. All external (not already packed) files will get special attention. The behavior for images depends on the selected option in the export panel (default can be adjusted in preferences):
- Pack ALL Textures: All textures used by the exported Objects are packed into the library.
- Pack NO Textures: No texture packing is done.
- Select in dialog: The following dialog is used.
For the last option and in case there are textures to pack, this dialog is presented to you, showing all external image files. From here, you can select the images that you wish to pack into your Asset Library. So giving the library to someone else don’t miss textures. This is especially useful when baked textures are used.
After the asset is packed to your library a cleanup process is automatically started, which removes duplicate images from your library. This is identical to the image cleanup feature from the Tools Panel. Have a look at this section on more details.
By clicking on the ![]() icon, you can see where the specific image texture is used. To pack the respective image file, select the checkbox in front of entry. Or you can select all or none with the buttons on top of the dialog.
icon, you can see where the specific image texture is used. To pack the respective image file, select the checkbox in front of entry. Or you can select all or none with the buttons on top of the dialog.
Click one OK to start the export.
Pie Menus
As a smart helper, I’ve added Pie Menus to both the Shader Node Editor, as well as to the Geometry Nodes Editor. The Pie Menu in the Shader Nodes Editor is partially borrowed from my Shader Node Wizard Addon. These Menus can be invoked by hitting the D-Key inside the respective Node Editor. If Shader Node Wizard is installed as well, you can can choose in preferences which pie menu should be preferred in Shader Node Editor. In any case, you can switch between the two (AWP & SNW) in the south part of the menu.
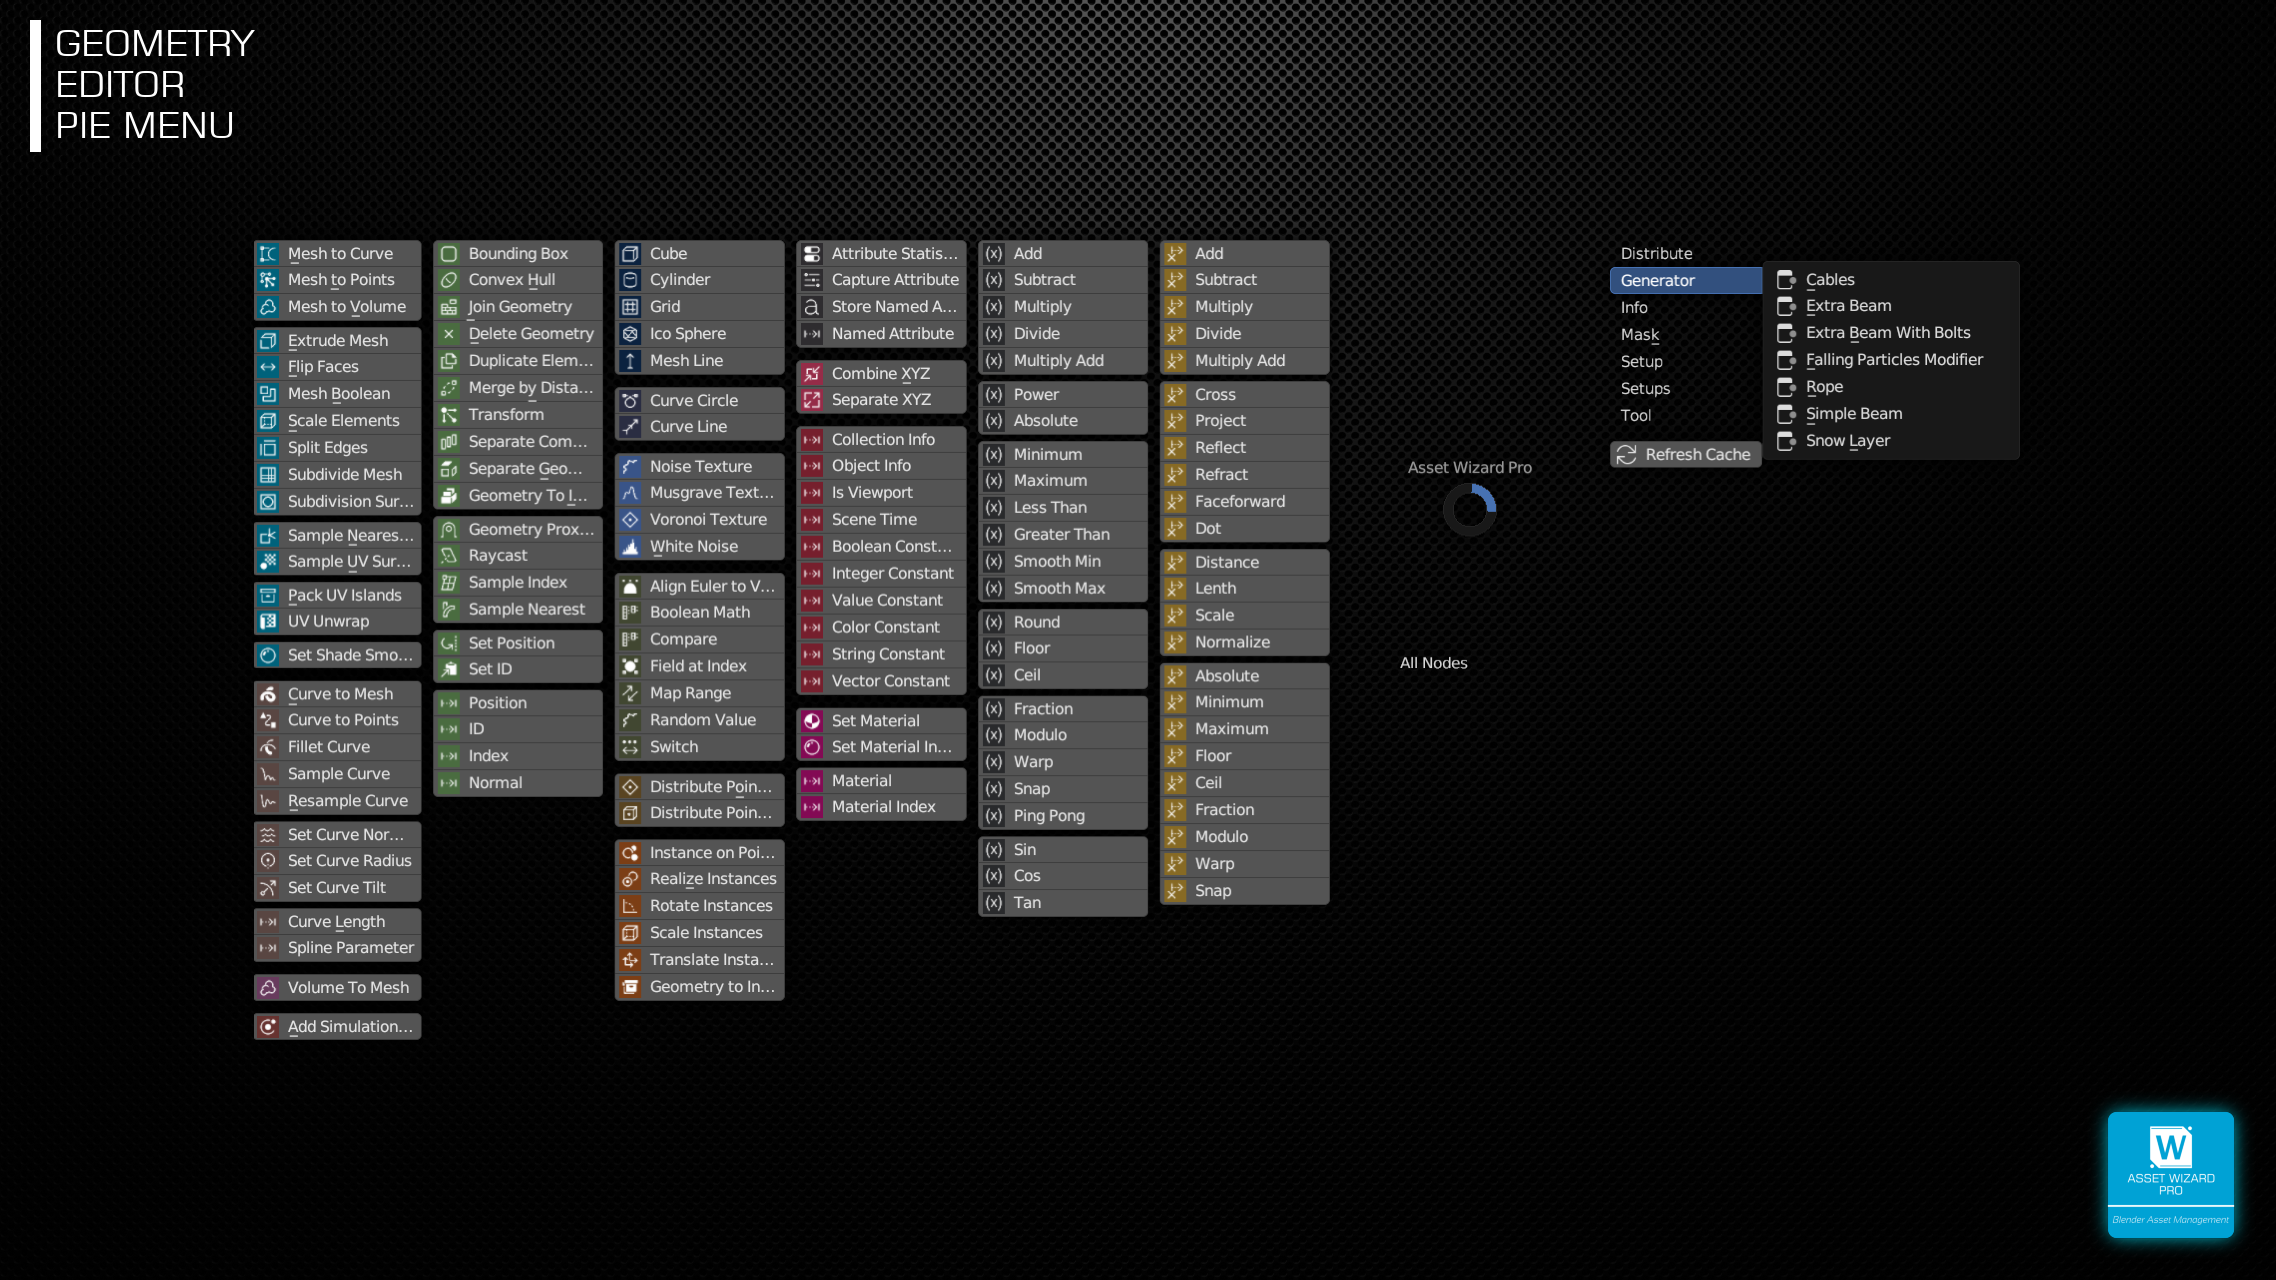
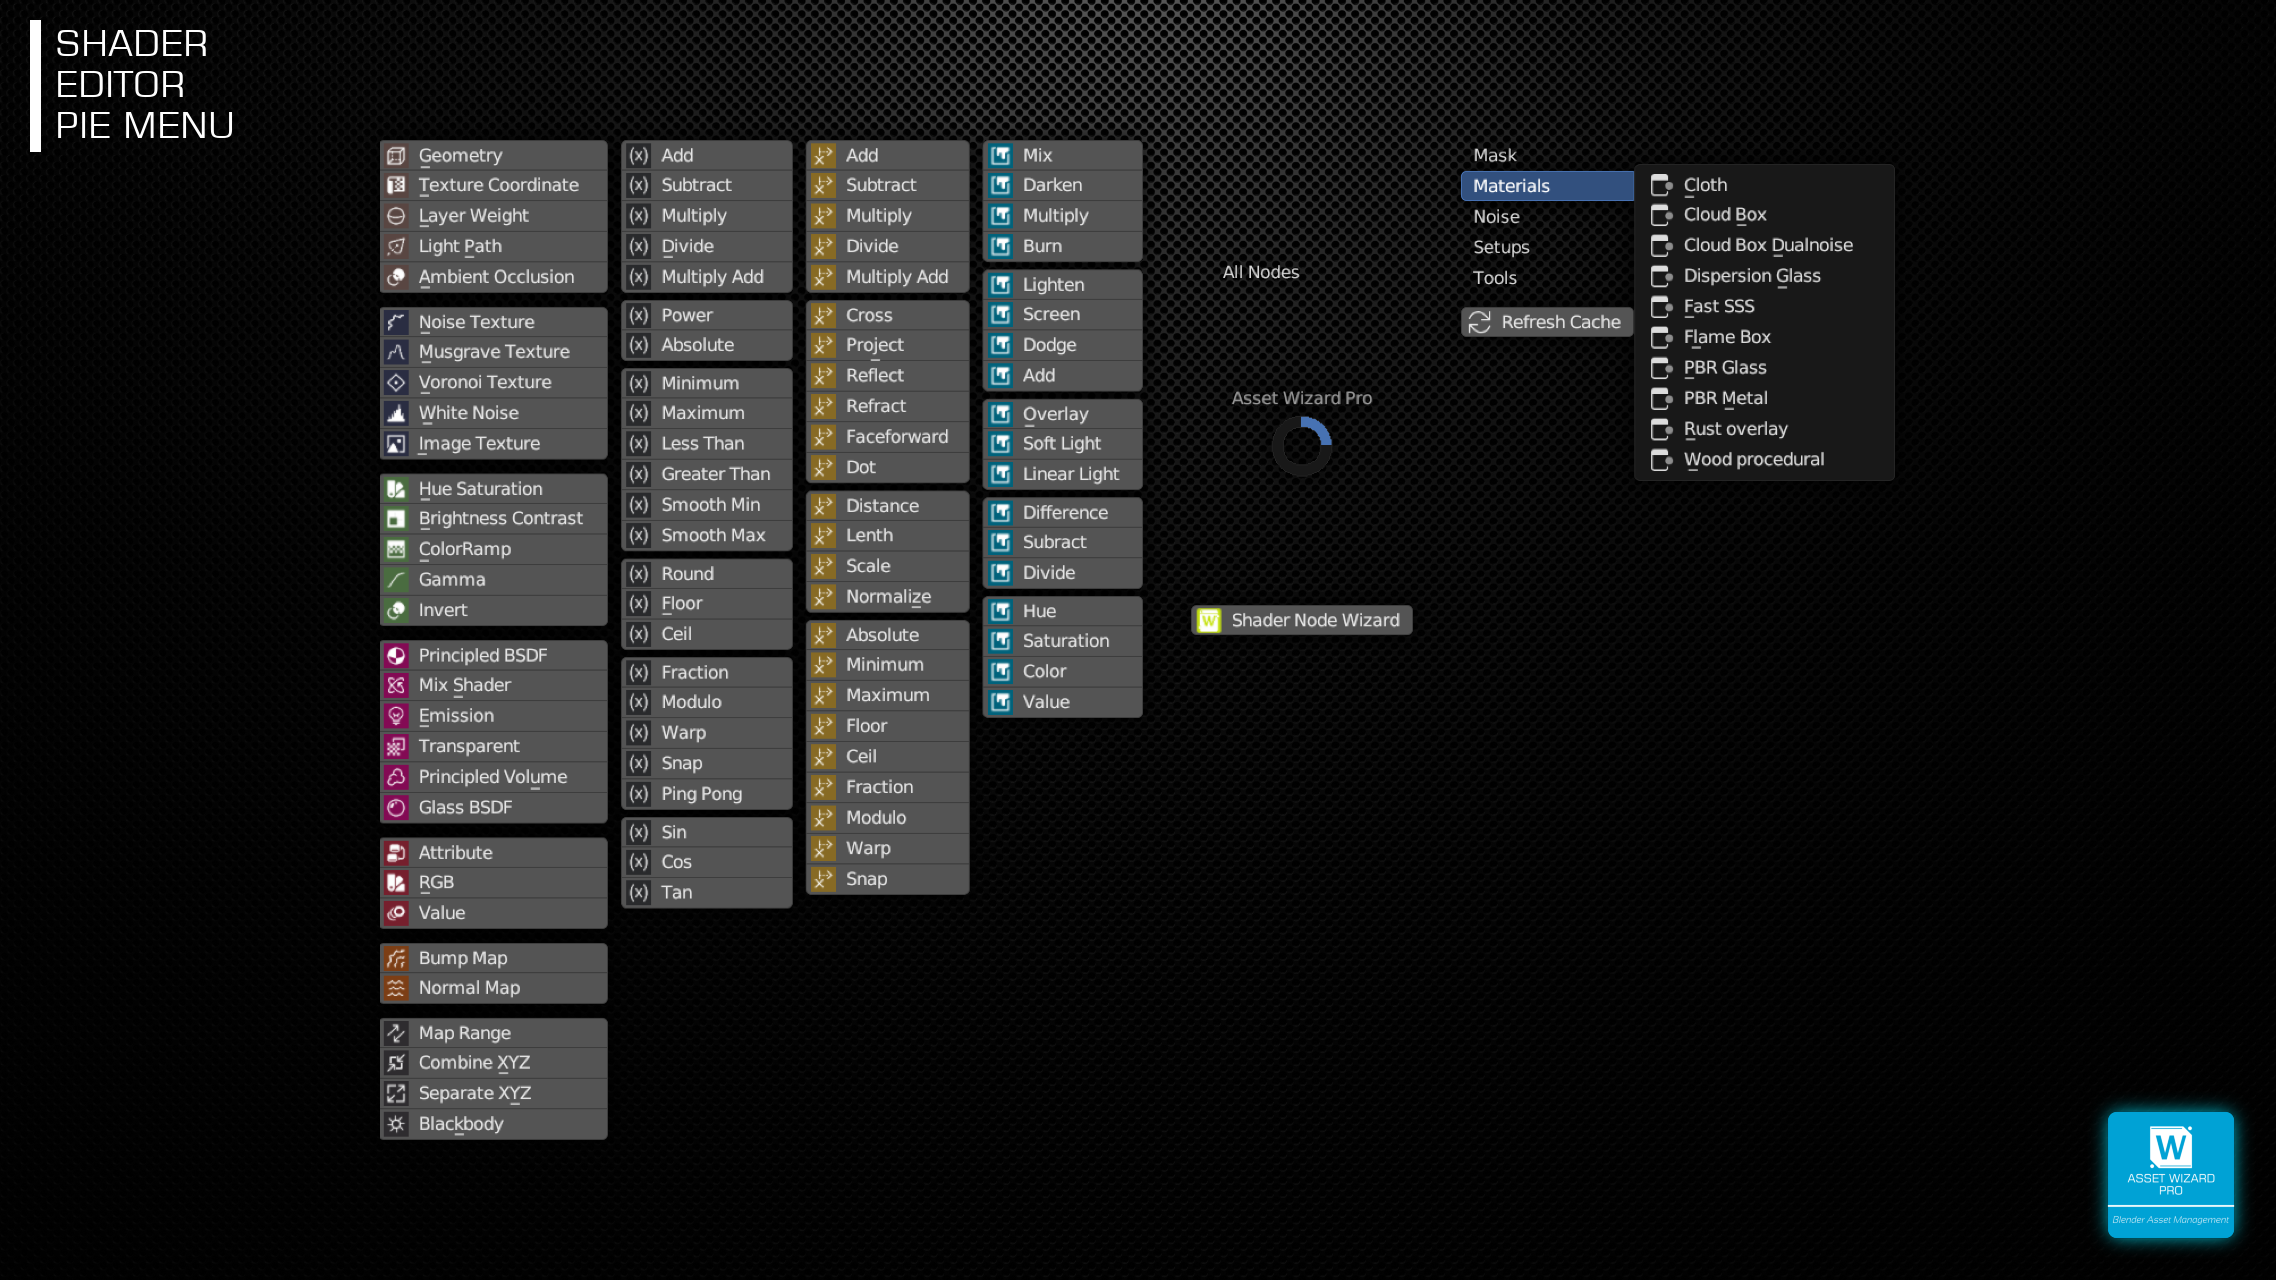
There’s not much to describe to these Pie Menus. Selecting one of the Nodes allow you to place them in your Node Tree. The Standard Nodes in both Menu’s are the most used one in my experience, but this may be enhanced or changed in future versions. Recommandations are always welcome.
The right Side contains all Nodes from your Asset Library, grouping can be selected in preferences (Import Node Group Mode).
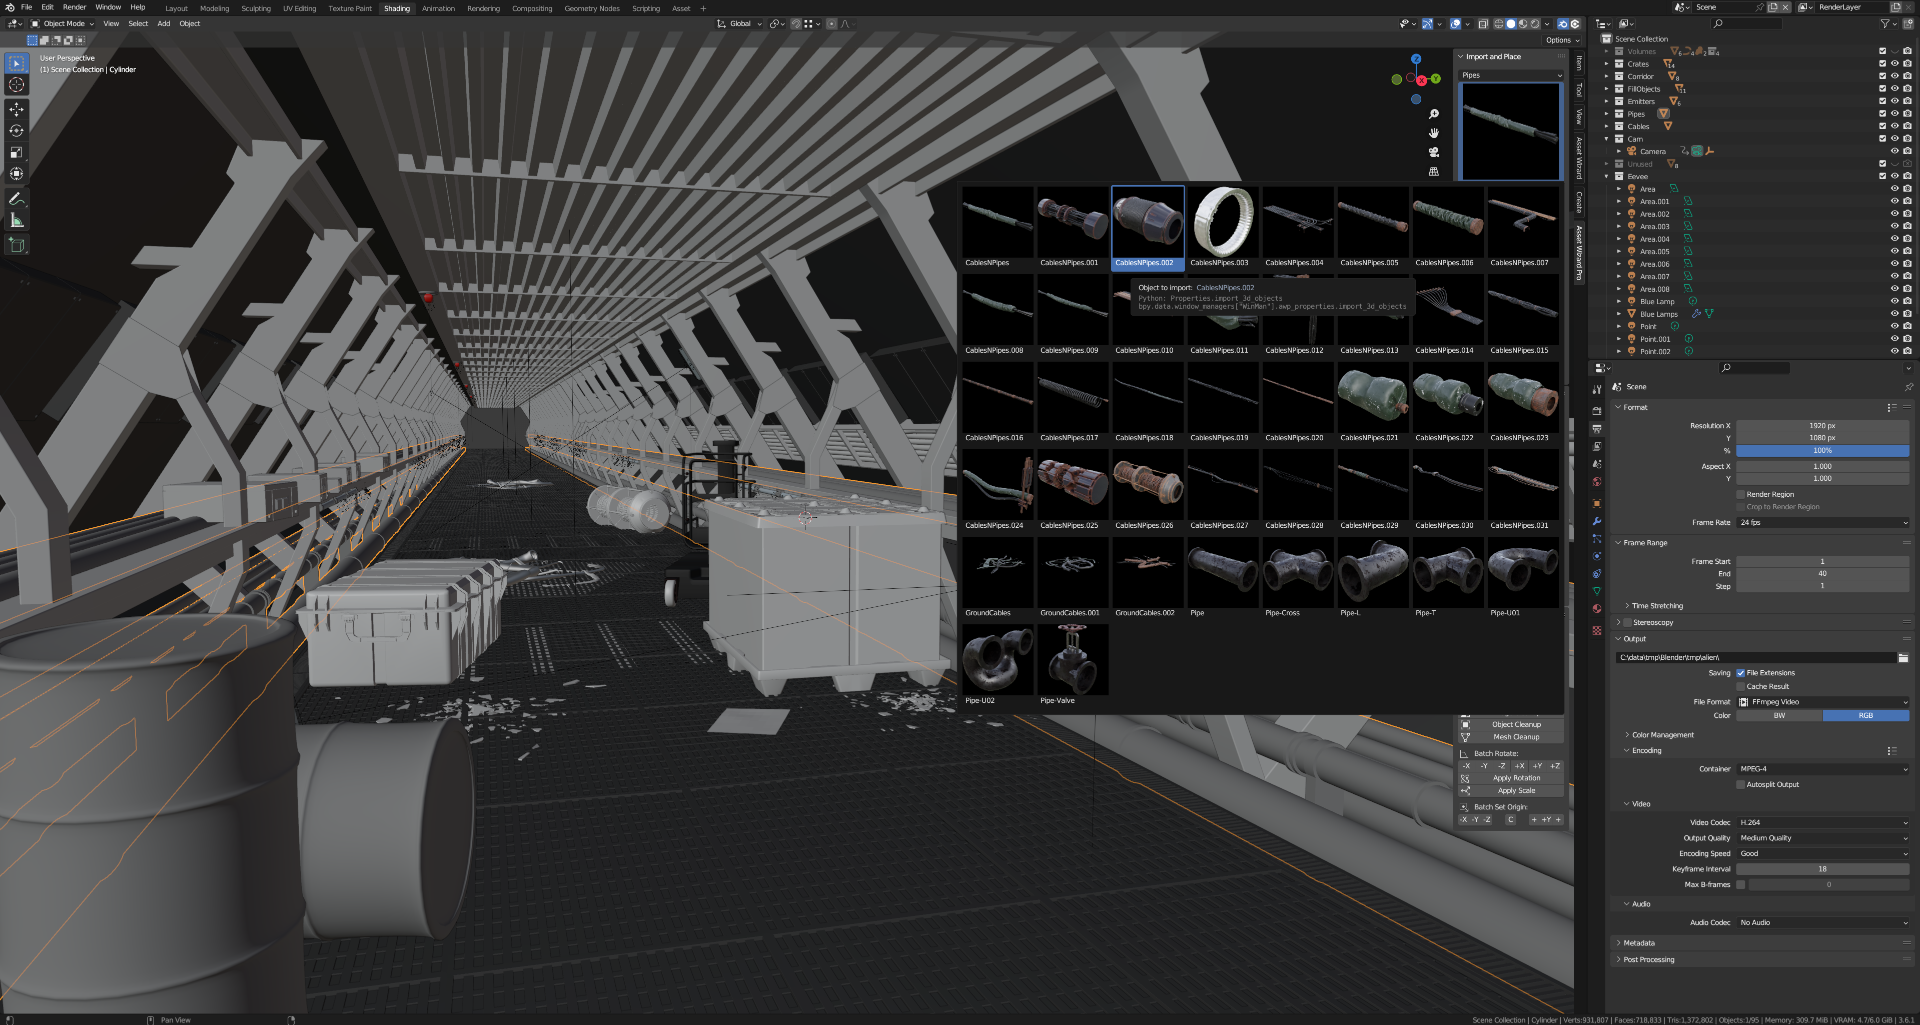
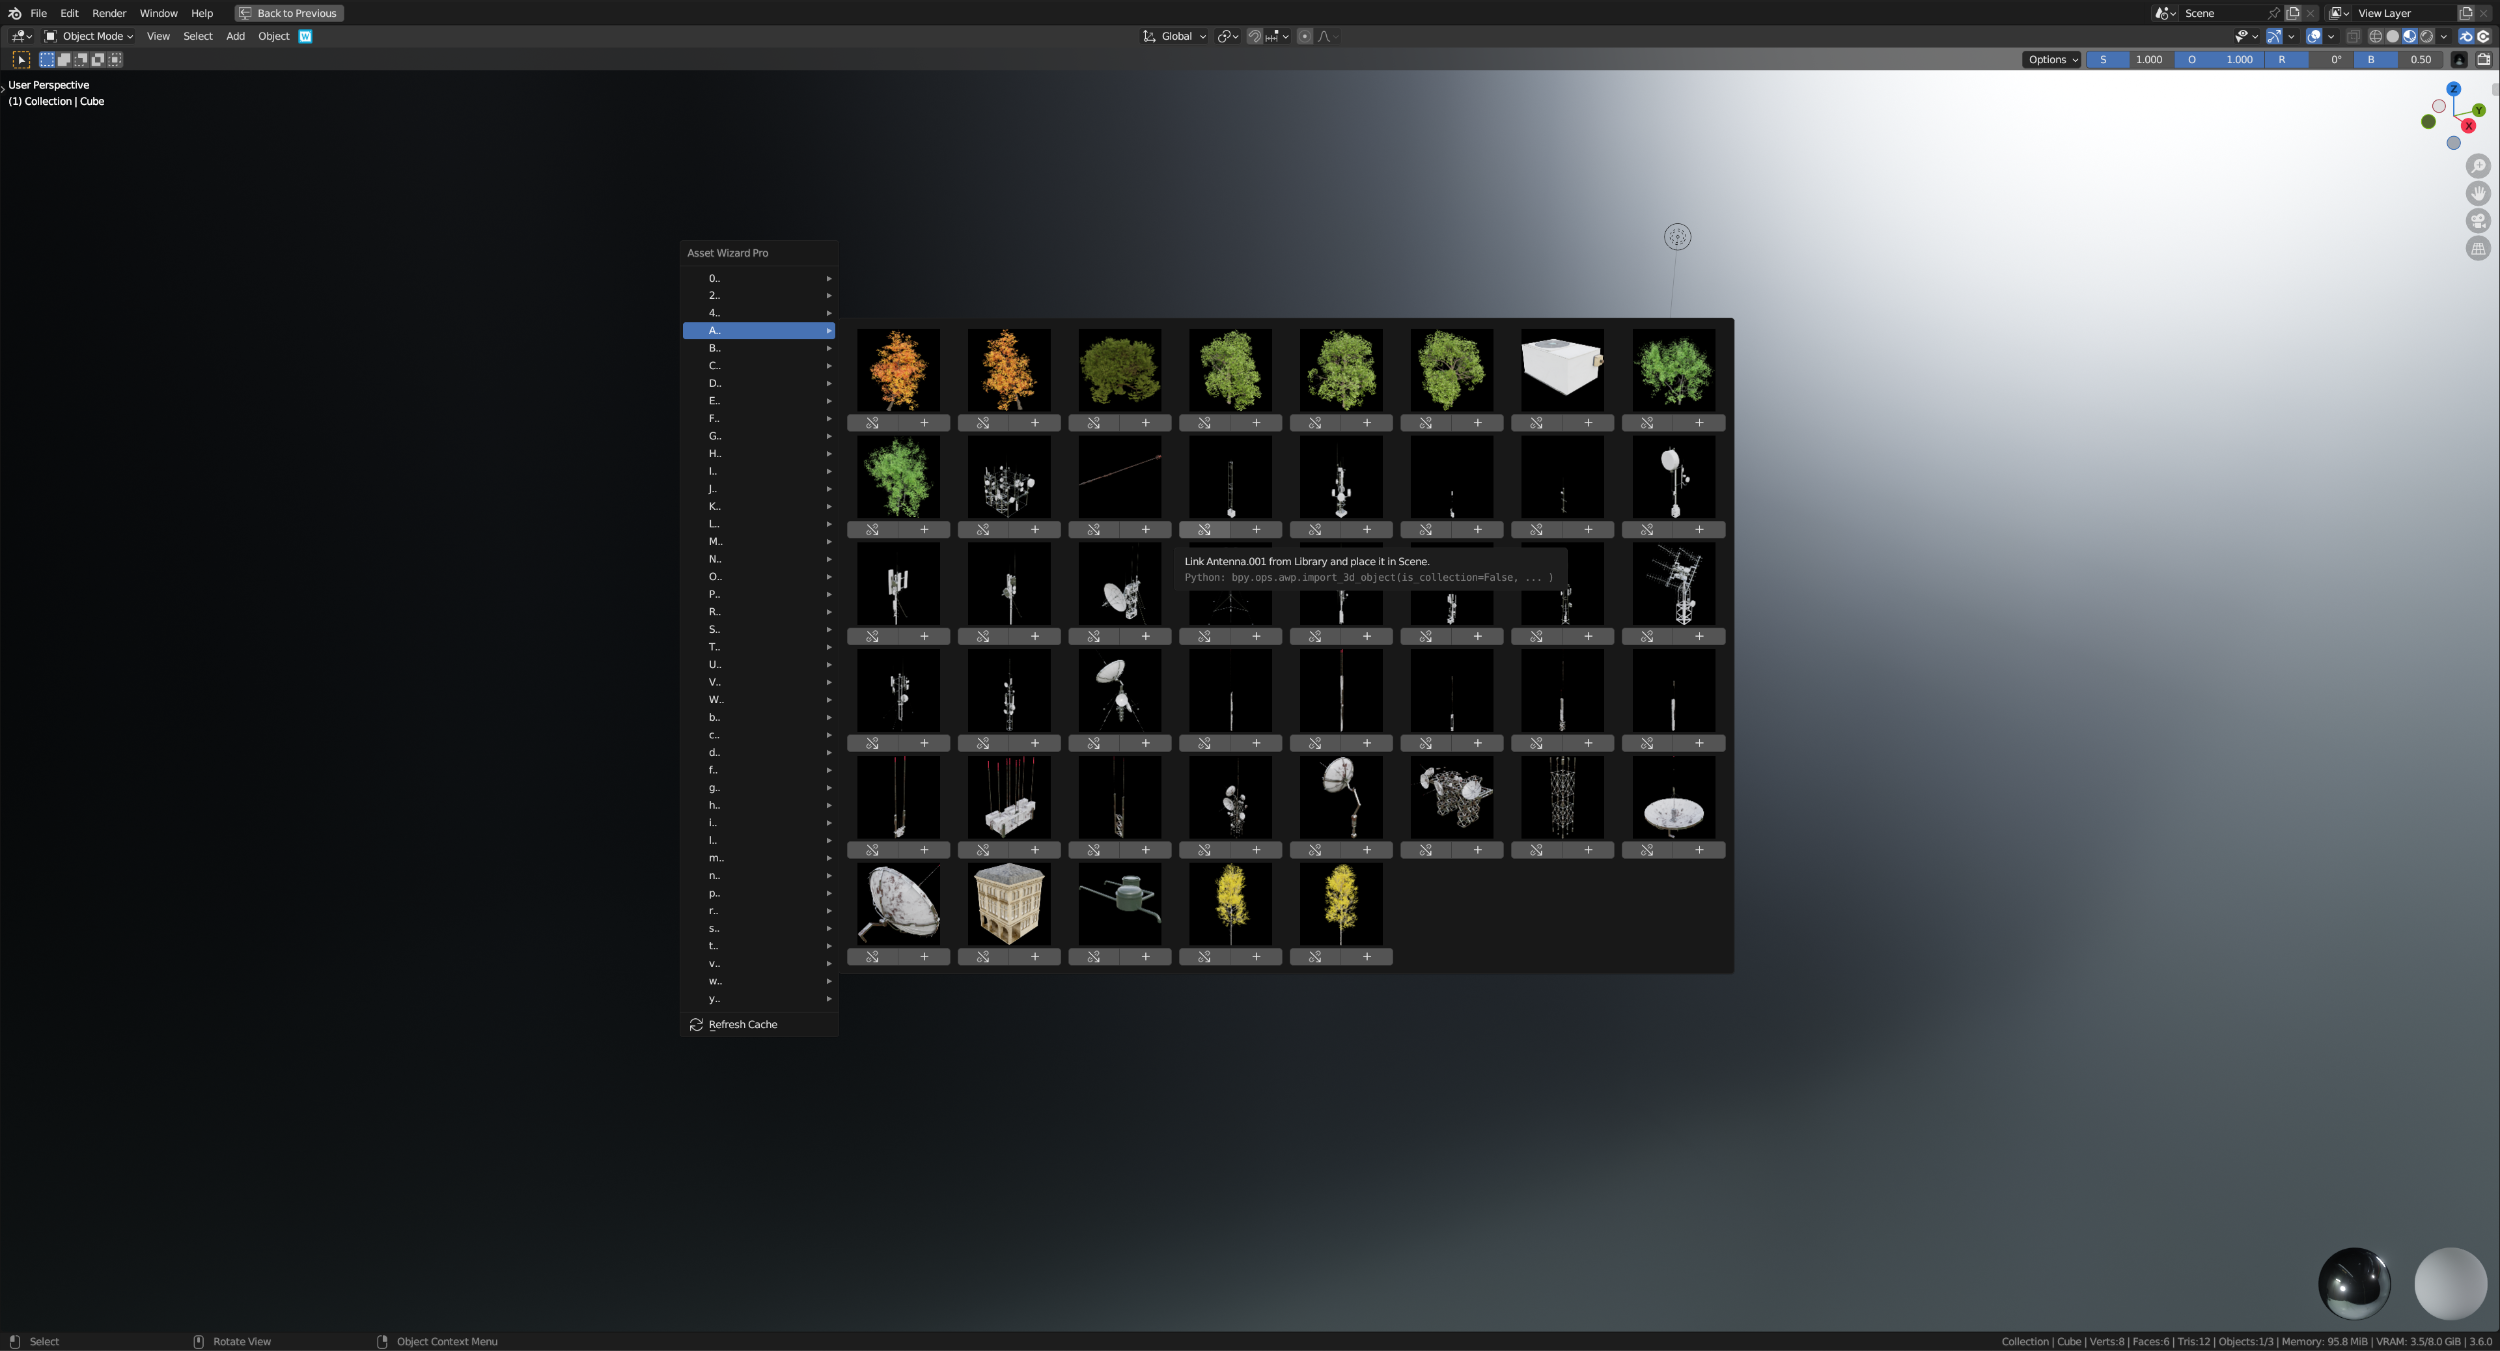
Import and Place Panel in 3D View

Collections and Objects
A quick way to add objects from your library into the 3D view without the need to have the Asset Browser opened. Besides that, it uses AWP’s Placer to place the asset in the scene. See below on how to use the placer.
There are two options below the asset selection, both add the asset and start placing:
- Link
 : The collection or object is linked from library to the current blend and into the scene. A library override is automatically created, so placing is possible.
 - Append
 : The object is appended to the scene.
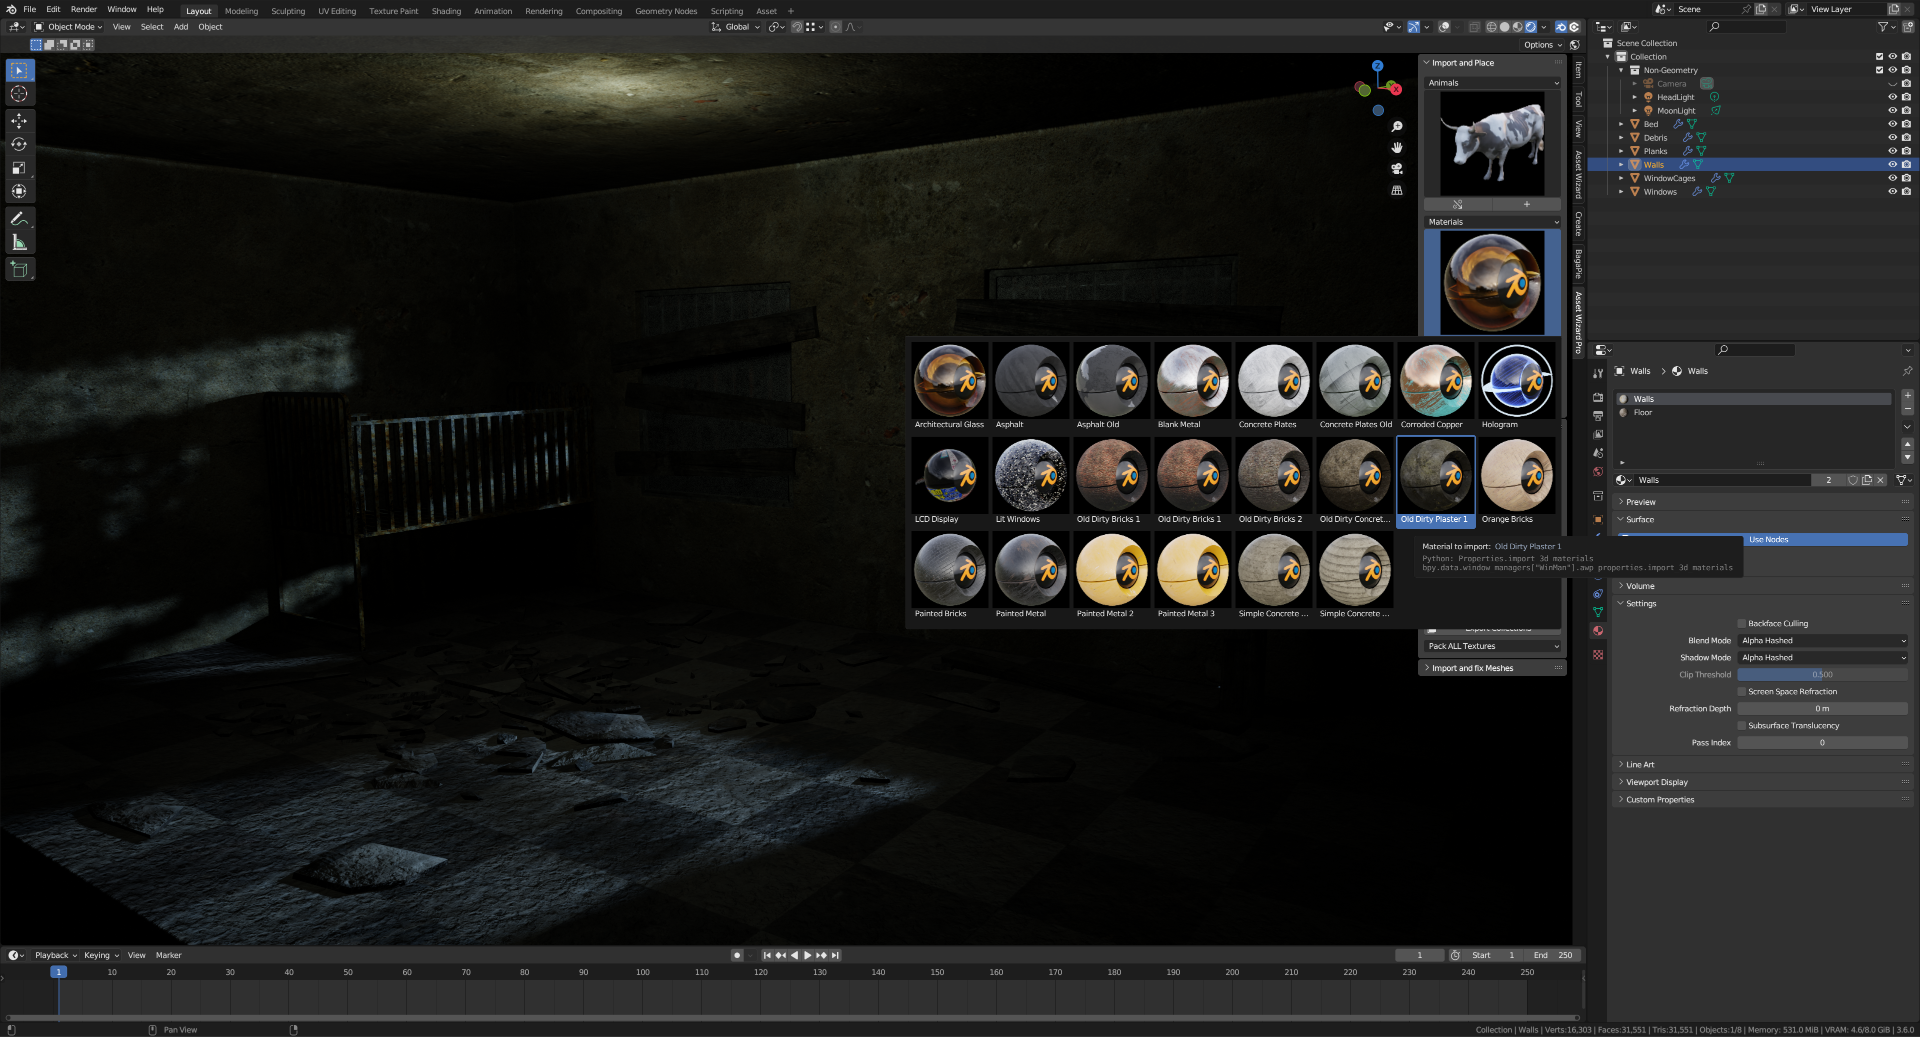
Materials
This links or appends a material from the library to the current blend and assigns it to one or more objects.
- Current Object
 : Assign the Material to the current Object (all slots)
 - Selected Objects
 : Assign the Material to currently selected Objects (all slots)
 - Active Material Slot or Current Object
 : Assign the Material to the currently selected Material Slot of the active Object
 - Append or Link : Choose to either append the Material (default, does not require much memory) or to link ()
- Prefer existing Material
 : In case of append, prevent to append again (link does this automatically). Otherwise it is appended again ()
Inline import Object
This is currently an experimental feature and must be enabled in Preferences. If enabled, the icon in the header of the 3D View is shown, as well as the shortcut for Asset Insert Pie Menu (default: Ctrl-E in 3D View) is active.
This allows to insert Collections and Objects directly from a context menu, so you essentially can work with full screen 3D View.

Placing Tools
When dragging an Object from the Asset Browser into 3D View, you have a nice Option to place your Object onto other Objects Faces. But after you have placed it, this Feature is lost. When Link is chosen, you don’t have this feature at all.
AWP’s placing Tools fill this Gap. Select any Object in your Scene and click on Place Object or press E-Key, you have the same feature like that from Asset Browser. But much more extensive. Before placing the Object, you can Rotate, Scale and Translate the Object in place. Besides that, you see the Object.
See it in Action:
Quick Mode
Quick Mode is very similar to Blender’s Asset Drag Feature. It is enabled when the Clock Toggle is selected. Select an Object to place and start using Place Object or E-Key. Besides choosing a Place to drop your Object with the Mouse, you can use Ctrl-Wheel to Rotate, Alt-Wheel to Scale and Ctrl-Alt-Wheel to Translate. Buttons X, Y and Z select the Axis. C resets to all Axes. As it is unusual to rotate or translate on all Axes at once, Z is used if all Axes are enabled. LMB finishes the Operation, while RMB or ESC cancel it. There are other features like N to disable Normal Orientation or Q to reset Transformation, take a look at the help Section in the Overlay.
Standard Mode
If the Clock Toggle is disabled, Standard Mode is used. This is a little bit more complex and more targetted to detailed Adjustments. It acts in different Stages.
- Place Mode: After starting the place Process with Place Object or E-Key, you just select where to place the Object. N toggles Orientation. LMB enters Adjust Mode, RMB or ESC cancel.
- Adjust Mode: Controls available from Quick Mode (see above) are valid here, except the Insert Position doens’t change when moving the Mouse. In addition, pressing G, R or S enters Move, Rotate or Scale Mode. LMB places the Object as currently seen and finishes, while RMB or ESC return to Place Mode.
- Move, Rotate , Scale Mode: These behave very similar to Blender’s GRS-Modes. Move the Mouse, filter Axes by using X, Y, Z or C. LMB accept the modification, RMB or ESC cancel them. Both choices return to Adjust Mode.
Commons to both Modes
The Buttons below Place Object offer addtitional behavioral features. The first Toggle, left of to the Clock Toggle, enables or disables Replace Mode. See the following Section. The Clock Toggle switches between Quick and Standard Mode. The next one is the Copy Toggle. If disabled, you just place the currently selected Object. If enabled, the Object is duplicated when starting the place Operation. The fourth Toggle is only visible if the Copy Toggle is enabled and is the Linked Copy Toggle. If enabled, the created Copy is a linked Object, same as when duplicating Objects with Alt-D. So Mesh-Data is reused on all Copies. The last Toggle is the Auto Parent Toggle. If enabled, the placed Object is automatically parented to the Object that owns the face you place your Object onto.
Replace Mode
When the first Toggle below Place Object is enabled and you start a placing Operation or by using Shift E Key, you place in Replace Mode. This means, the Object is not placed onto the face of another Object, but it replaces it. This can be very useful for replacing simple Geometry with Kitbash Objects. Your placed Object receive the Transformation from the target Object as a starting Point and you can do the same as described above in Place Mode.
Import Panels in Node Editors
Both in Shader Node Editor and Geometry Node Editor, an Import Panel is located below the Export Panel. This just contains the same things as the Pie Menus on their right Part, just in a linear Layout. If you don’t like Pie Menus, you can import/create your Asset Node Groups from there as well.
Import and fix Meshes Panel in 3D View
The Tools Panel is located in 3D View, just below the Export Panel. It contains many features to Import and Batch Process. Read through the following Section to see what is possible.
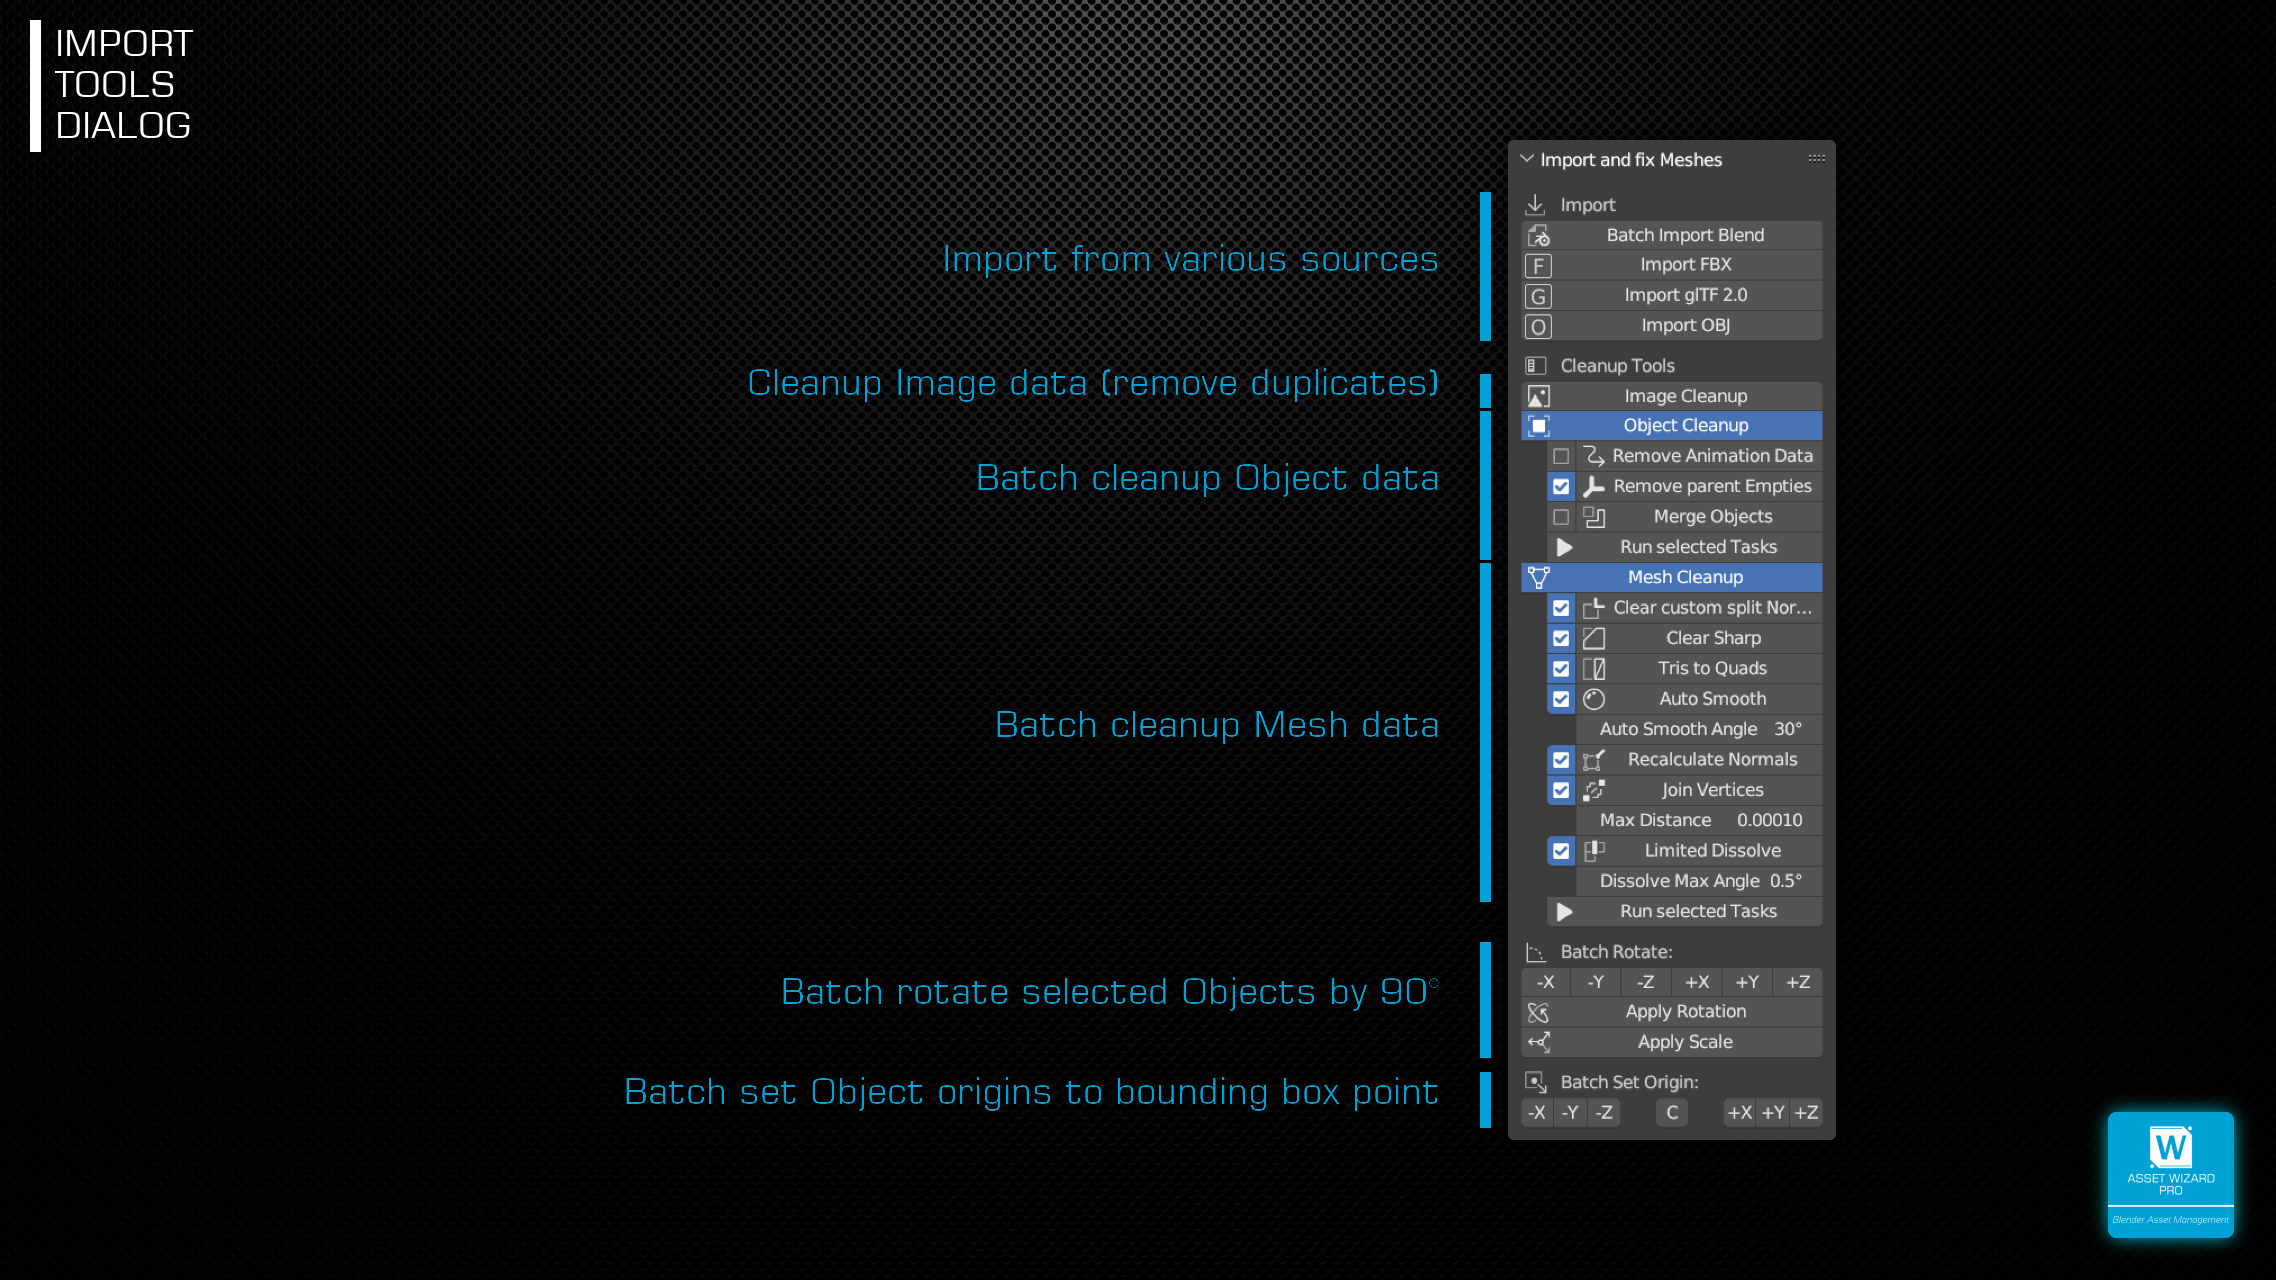
Import
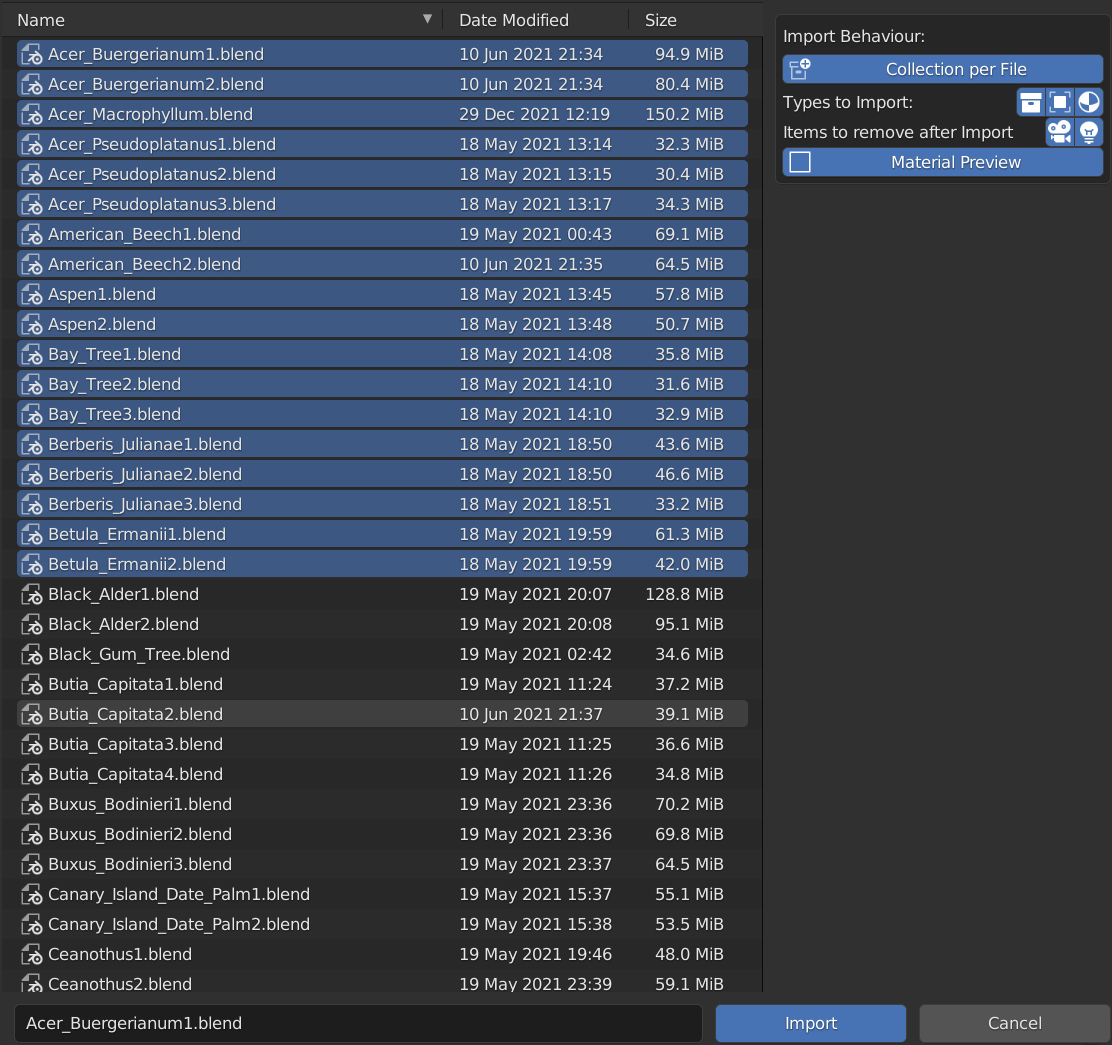
Batch Import Blend
This opens a file dialog, where can can select one or more .blend files. When clicking on Import, all chosen items were imported to you current scene and placed in a grid.
The options in the side panel define how the import is done:
- Collection per File: If enabled, a new collection is created for each file and named to the base filename. All imported items from this file is placed into this collection.
- Types to Import: Choose what to import, collections, objects and/or materials.
- If collections and objects is enabled, only objects that are not part of a collection are placed in the parent collection.
- If collection is disabled, but objects is enabled all objects (even those are part of a collection) are put linear into the parent collection.
- If materials is enabled, all materials are imported, also those not used by an object.
- Items to remove after Import: You can select that imported cameras and lights (which are objects) get removed after import. These are not really useful in this scenarion.
- Materials Preview: This option is available if material import is enabled. In the case, the importer create a simple plane for each material and places this into your scene.
Other Importers
Those importers for FBX, GLTF and OBJ are just the ones that ship with Blender. If you miss one or more of these importers, the Addon to import is not enabled. Enable the missing importers in your Blender Preferences, section Addons.
Cleanup Tools
Image Cleanup
This starts removal of duplicate images in your current opened Blend file. If some where detected, the script assigns all users to the same image, so you can’t have the same image multiple times in your file and waste space. Detecting duplicates takes place on binary level. This means, even if the image has a different path or filename, if the packed data is identical, it is suspected to be the same image (internally this is done creating a hash from the whole packed data block and find identical hashes).
This process favors packed images. This means if a packed image is used in one material and an external image is used in a different materials, the second image is assigned to the packed instance, which frees all usages of the external image and removes it on next save.
Object Cleanup & Mesh Cleanup
Both Sections are structured identically. They offers Blender standard Features that were by default applied to the currently active Object / Mesh. The buttons here do all operations on ALL selected Objects which is be very time saving! One Click here may safe dozens of Clicks using Blender’s own Features. But you can also run multiple Options with one Click. Each Entry in these Menus is split in a Checkbox and the Operator itself. Clicking on the Operator, runs the chosen Operation on your selected Object. The Checkbox is just a Toggle. If you click on Run selected Tasks, all enabled Operations run from Top to Bottom. After Blender has started, a default Selection is chosen. You can adjust the selected Items in AWP’s Preferences.
See both Features in Action:
Object Cleanup
- Remove Animation Data: As the Name suggests, removes animation Data from selected Objects. Some Objects imported from FBX, GLTF or OBJ contain animation Data that isn’t used. Don’t waste Memory. Besides that, this can affect the following Operation.
- Remove parent Empties: Imported Objects from FBX, GLTF and OBJ often result in large Hierarchies (see Video above). This is fine, but not always usable. This Operator removes all Empties without loosing the original Transformation of the resulting Meshes. Attention: Animation Data may create strange results.
- Merge Objects: This finally merges all selected Mesh-Objects into one Mesh. Useful when finishing the Materials and pre-Export to the Asset Library.
Mesh Cleanup
- Clear custom split Normals: Many imported Objects come with their own Normals. They are sometimes useful, but if you want to rely on Blenders Normals, remove them.
- Auto Smooth & Auto Smooth Angle: Enable Auto Smooth on all selected Objects and set the Angle to this.Doing this on a hundred of Objects can be very tedious.
- Recalculate Normals: As seen in the Video, removing Custom split Normals can result in Normals in the wrong direction. This fixes it.
- Join Vertices & Min Distance: Some Formats have copies of the same Vertex for each Face. Blender doesn’t need this, merge them.
- Limited Dissolve: Especially when assigning Materials to imported Objects, it can be very tedious when flat Faces are split into many Triangles. This operator merges all those into N-Gons. This isn’t better Geometry, but eases Selection.
Batch Rotate
Inserting Objects from Asset Libraries in Scenes has a nice placing feature. But this depends on the Orientation of the Asset in the Library. Z-Up is always oriented to the target Normal. Having many Objects that require to fix this is tedious. Batch Rotate rotates all selected Object by 90° around the clicked Axis. Apply Rotation merges this Information into the Mesh Data.
Batch set Origin
Like the Rotation of an Asset, the Origin is another important Factor when placing Objects into your Scene. Just click on one of the Buttons here, to set the Origin of all selected Objects to a given Extend. AWP uses the Bounding Box of each Object and sets the Origin to the Center of the selected Axis Box Plane. The C Button places it to the Center of the Bounding Box. If you get wrong Results here, check the Rotation of the Object, it should be (0, 0, 0).
Update existing Libraries
As Asset Funtionality is available since Blender 3.0, I assume most of you already have existing Asset Libraries. To ease the update of Preview Images, as well as automatic Grid Placement, the Header Part of the Asset Browser has two additional Buttons. These Buttons are only available, if Current File is selected in Asset Browser.
- Update Preview: This will render a new Preview according to your Preferences for all Assets selected in the Asset Browser. Please note that the file must be saved to function, otherwise, this Button is disabled.
- Grid Button: The Button with the Grid Icon next to Update Preview will place all your 3D Objects that are marked as Asset in a Grid Layout. The Padding is used to configure the space between the Objects and Collections. The largest Object / Collection (by Bounding Box) is used to detemine the Grid Size.
Installation
Installation is quite simple. Open Blender’s Preferences (Edit/Preferences) and select Add-ons on the left side. Click Install… in the upper right Corner and select the downloaded .zip File. Final step is to enable AWP by clicking the Checkbox next to it.
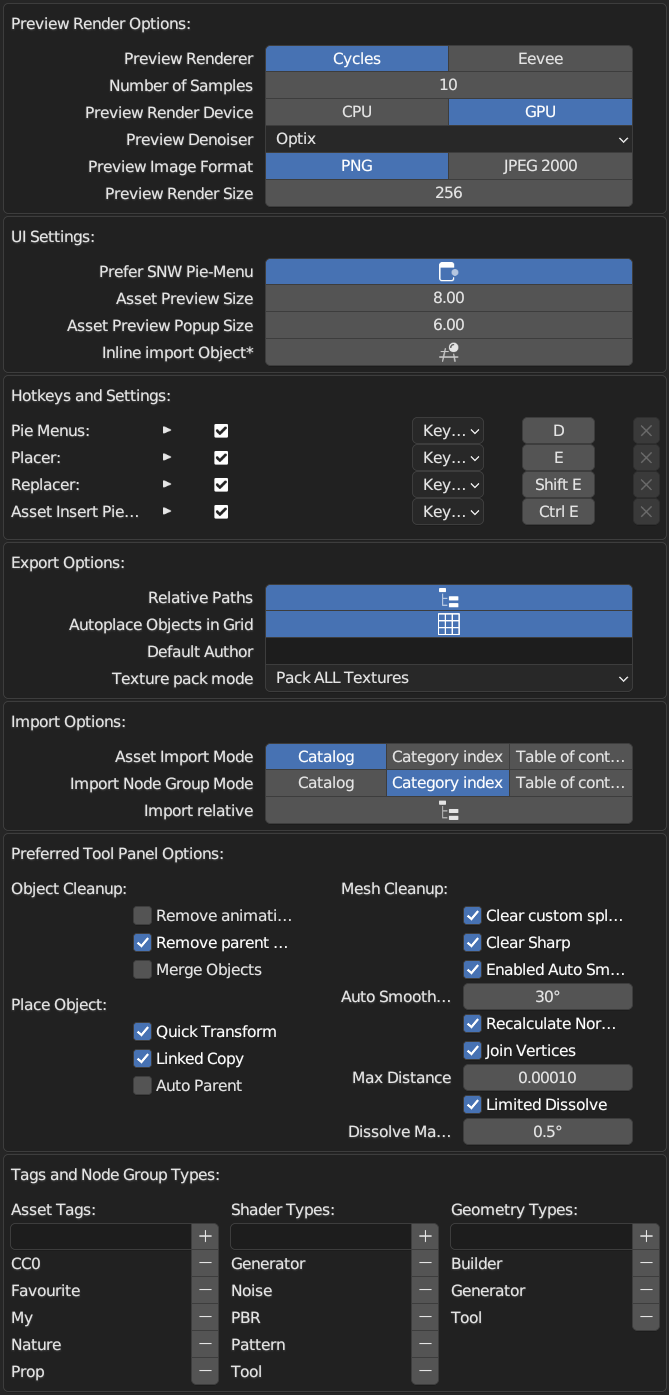
Preferences
- Preview Render Options: All settings related to preview image generation of assets.
- Cycles/Eevee: Choose which Engine is used for Preview Rendering.
- Number of Samples: The number of samples Cycles uses rendering a Preview (Cycles).
- Preview Render Device: Whether use CPU or GPU for rendering (Cycles).
- Preview Denoise: Denoise to use after rendering the image (Cycles).
- Preview Image Format: How the image is encoded after rendering.
- Preview Render Size: The Render Size for Preview Images. While 128×128 is faster and required less Memory, 256×256 are much sharper, experiment with this Value.
- UI Settings: Several settings for visualization and behavior.
- Prefer SNW Pie-Menu: If you’ve installed Shader Node Wizard as well, if this is enabled, the hotkey opens the Pie of Shader Node Wizard in Shader Node Tree (you can switch between both right from there).
- Asset Preview (Popup) Size: Scale factors for thumbnails in the Import and Place side panel.
- Inline import Object*: Whether to enable this experimental feature.
- Hotkeys and Settings: Edit shortcuts to several features.
- Pie Menus: Define the hotkey for the pie menu in both Shader Node and Geometry Node Editor. D-Key is the preferred one.
- Placer: Hotkey to place the current selected object.
- Replacer: Hotkey to place current selected object in replacer mode.
- Asset Insert Pie Key: The hotkey if Inline import Object is enabled.
- Export Options: All settings related to export of objects, materials and nodes.
- Relative Paths: If enabled, the paths in your library will converted to relative paths after the assets have been place there.
- Autoplace Objects in Grid: After exporting an Asset to a Library File, it is placed at the Position from the current .blend. If this is enabled, AWP layouts all Assets in a Grid, so your Libraries look clean. Grid Size it determinated by the largest Object in this Library.
- Default Author Name: On startup, this is propagated as Author Name to all Export Boxes. No need to enter it every time.
- Texture pack Mode: The default setting for Pack Images.
- Import Options: Settings for importing assets from the library to the scene.
- Asset Import Mode: Mode to group assets when using the Inline import Object feature, by catalog, by first tag or by first letter (toc).
- Import Node Group Mode: Mode to group nodes in Shader and Geometry Pie Menus, by catalog, by first tag or by first letter (toc).
- Preferred Tool Panel Options: Default options for the Object and Mesh Cleanup Settings in the Import and fix Meshes side panel, as well as Place Mode defaults.
- Tags and Node Group Types: Available Tags and Categories for elements on export.
- Asset Tags: Those Tags are available for quick Selection in all Export Panels. They where tracked in ~/.asset-wizard-pro/config.json, so are consistent between all your Blender Installations. Add new Tags by enter them in the Text Field and hit the + Button. Remove by hitting the – Button next to them.
- Shader/Geometry Types: This is used to group Shader and Geometry Node Groups in the Import Panel and Pie Menus. Adding and removing is same as with Asset Tags.
Changelog
1.6
- Blender support up to version 4.5
- Export panel restructured with clearer “Export to” flow
- Catalog handling improved; duplicate/invalid entries cleaned up
- New “Open in Blender” buttons for easier access to library assets
- Export/import panels show clearer messages when libraries or catalogs are empty
- Mesh cleanup reordered, UI adjusted accordingly. Smooth shading now uses Geometry Nodes, starting in Blender 4.2
- Many operations (placing, exporting, cleaning, catalog creation) now show clear error messages instead of silently failing
- Temp files are unique and cleaned up more robustly
- Config and cache now respect Blender’s portable folder if present
1.5.1
- Faster, smoother asset scanning with automatic previews (runs externally).
- More reliable asset list in the browser (no temp-linking hiccups).
- Blender 4.1: smoothing behaves correctly after mesh cleanups.
- Blender 4.x: handy OBJ import button in the Tools panel.
- Small stability and UI polish.
1.5
- Object Placer: info panel can start hidden (toggle in Preferences); smoother trackpad scrolling for adjust.
- Blender 4.0 support: “Update Local” works with the new Asset Browser; drawing/text rendering updated for 4.x.
- Export panel: tidier layout for 3D export options.
- Asset reuse: placing an already-loaded object now duplicates it by default for safer edits.
1.4
- Add support for importing Collections, Objects and Materials from the side panel in 3D View
- Pie Menus visually overhauled
1.3
- Updated handling of large Lists of Node Groups
- Multi-Collection Export using List Selection
- Texture Pack for Object and Collection Export has multiple Options now
- Auto set Insertion Point of Collections to Center -Z on Export (so appending exported Collections to your scene, places the Collection with bottom Center on insertion Coordinate)
- More preview render options in prefs
- Object Placer ignores Targets displayed as Wire or Object Bounds (e.g. Clouds or Fire)
- New Mesh cleanup Shortcuts (Tris to Quads and Remove sharp Edges)
- Shader Node Pie standard Nodes updated to fit latest SNW Layout
- New Geometry Nodes added to Pie Menu
- Better Object Placing Algorithm in Library-File
- Minor Fixes
1.2.2
- Stability fixes
- Max Angle added to Limited Dissolve in Tools Panel
1.2.1
- Support for non-latin Path and File Names added
1.2
- FBX, GLTF and OBJ Import Buttons added to Tool Window
- Object and Mesh Cleanup Options added
- Other Batch Operations, namely Batch Rotation and Batch set Origin added
- Placer and Replacer Mode added
1.1
- Image packing on Export added
- Blend Batch import added
- Image cleanup added (On Export and from Tools Menu)
- Preferences Overhaul + Option to adjust Hotkeys
1.0
- Initial Release